Category: Kitchen

  • Sixteen Pieces, Eleven Jobs: Auditing a Cookware Set Before You Buy

    Sixteen Pieces, Eleven Jobs: Auditing a Cookware Set Before You Buy

    Cookware silhouettes on a counter with the numbers 16 and 11

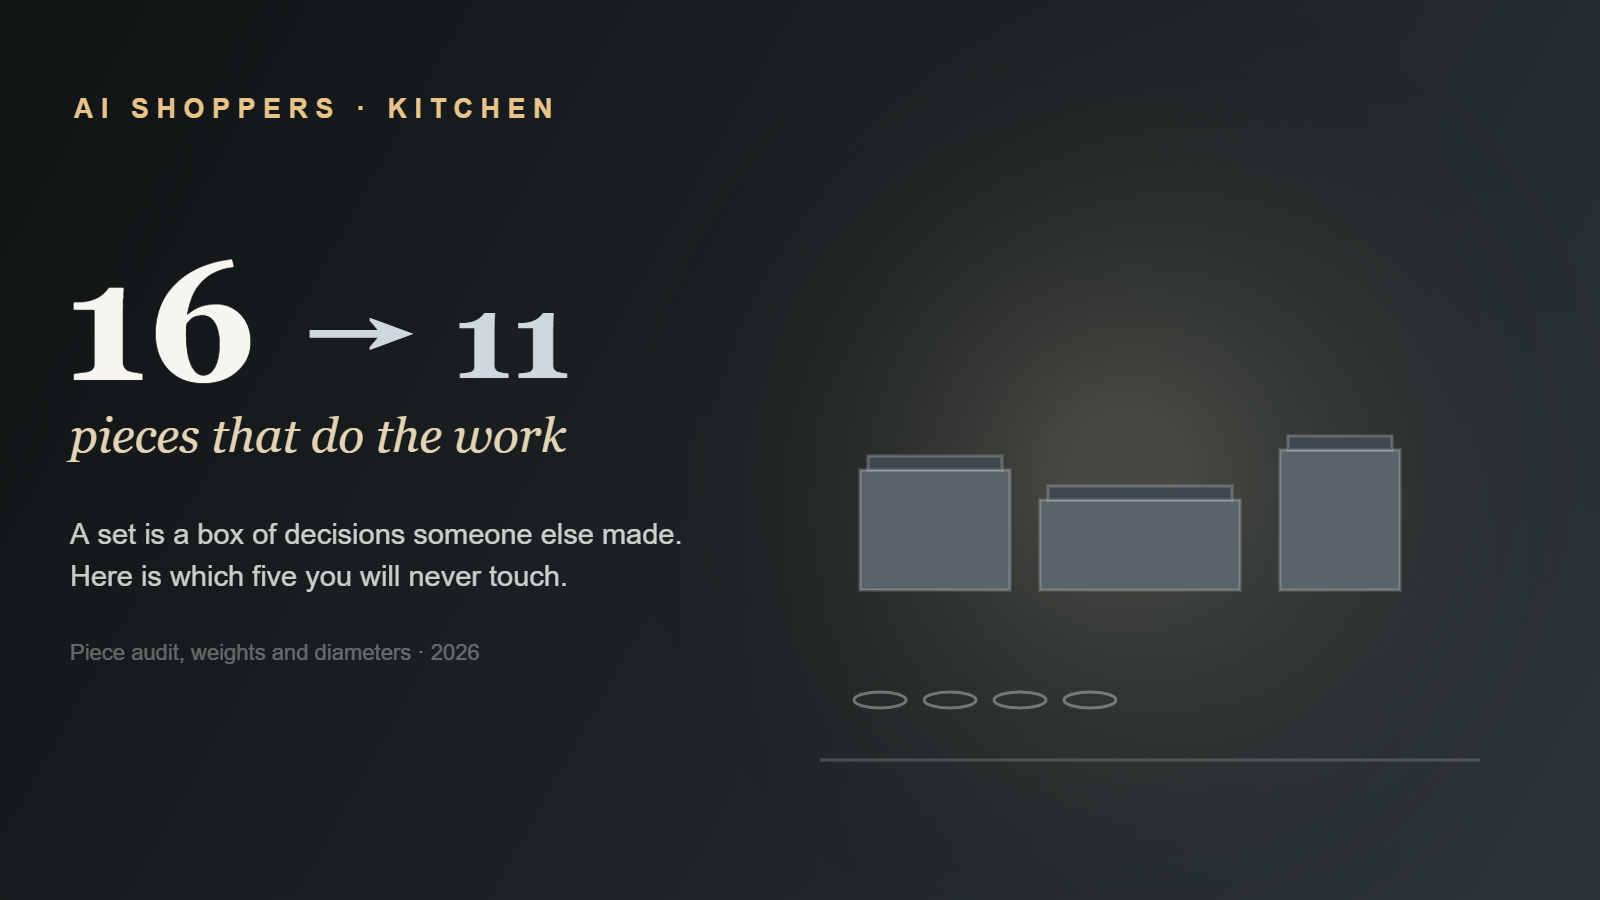
    A sixteen-piece cookware set is not sixteen tools. It is a box of decisions someone else made about what you might cook: two saucepans, a frying pan, a stock pot, four lids, and a handful of accessories that exist mostly to make the carton feel full. If you count what actually gets used in a normal kitchen over twelve months, the number lands near eleven.

    That is not a complaint about sets — they are the cheapest way to equip a first kitchen. It is an argument for reading the piece list before the price, because the difference between a good set and a mediocre one is not how many items it contains, but how many of them fit a job you actually have.

    1. The piece list is the specification

    Manufacturers count lids as pieces. So a “16-piece set” can contain six actual vessels and ten supporting items: four lids, a steamer insert, a spatula, a ladle, two pot holders, and a rack. Before anything else, sort the list into vessels and accessories. A set with eight vessels and eight accessories is a different product from a set with five vessels and eleven accessories, even at the same price and the same box size.

    A quick arithmetic: divide the price by the number of vessels, not pieces. At $94 for a 16-piece set with six vessels, the vessel cost is about $15.70 each; if a competing set offers eight vessels at $110, that is $13.75 each with two fewer gadgets. The second is usually the better buy.

    2. What a real kitchen actually uses

    Track any household for a month and a pattern appears. A 20 cm frying pan gets used several times a week. Two saucepans — 16 cm and 18 cm — cover rice, pasta and reheating. A 24 cm pot handles soup and stock. Two lids fit all four. That is six pieces doing almost all the work; add a steamer insert and a colander and you reach eight.
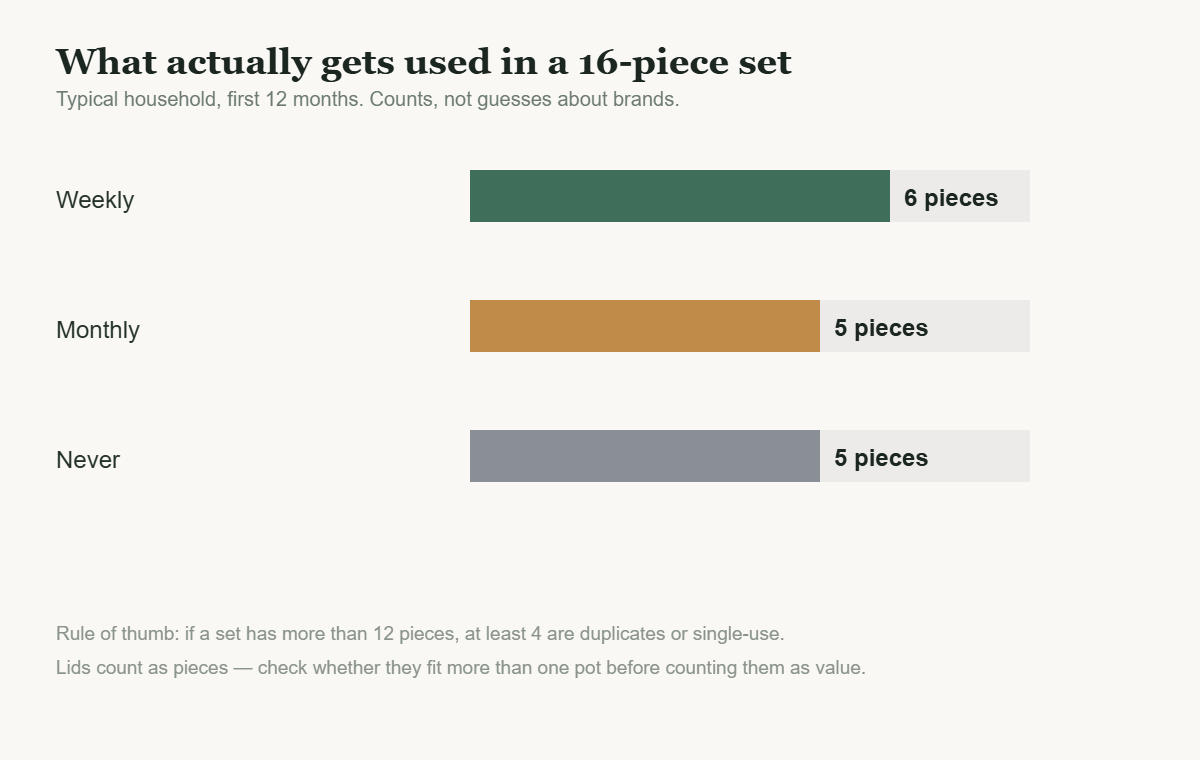
    Bar chart of pieces used weekly, monthly and never in a 16-piece set
    Typical split over 12 months: six weekly, five monthly, five never.

    3. The five pieces that go unused

    The unused pieces are predictable: an extra lid that fits nothing else, a tiny 12 cm pan, a second spatula of lower quality than the first, a “grill plate” that is thinner than any pan you own, and a plastic measure that discolours in the dishwasher. None of them is broken; they simply have no job that the other eleven do not already do.

    This matters for storage: five unused pieces occupy roughly 0.02 m³ — a shelf and a half in a small kitchen — and cost money at the margin. In a 30 m² flat, that is the difference between a usable cupboard and a cluttered one.

    4. Diameters and the hob you actually have

    Pan diameter must match burner diameter within about 25 percent, or heat spills around the base and the handle gets hot for nothing. A 20 cm pan on a 14 cm burner wastes the outer ring; a 16 cm pan on a 22 cm burner puts flame up the sides. If your hob has one large and three small burners — the common layout — you need at most one 24 cm pot and two pans between 18 and 22 cm.

    Piece Typical size Weight (empty) Jobs per week Verdict
    Frying pan 20–24 cm 600–900 g 4–6 Essential
    Saucepan, small 16 cm / 1.5 L 450–600 g 3–5 Essential
    Saucepan, medium 18 cm / 2 L 550–700 g 2–3 Essential
    Stock pot 24 cm / 5 L 1.1–1.6 kg 1 Useful
    Steamer insert fits 20 cm 200–300 g 1 Useful if you steam
    Lids (4) 16–24 cm 150–350 g — Two are enough

    5. Coatings, weight and the honest trade

    A set under $100 usually has 1.5–2.5 mm aluminium bodies with a non-stick coating. That is fine for eggs and vegetables; it is wrong for a hard sear, because a thin base loses heat the moment food lands. The heavier the pan, the more forgiving — and the more expensive. If a set feels unusually light for its size, the metal is thin; if it feels heavy and the price is low, check whether the weight is in the base or in a thick handle.

    Weighing a pan is the fastest test available: a 24 cm pot with a 3 mm base should be 1.1–1.6 kg empty. Under 900 g means a thin base, whatever the listing claims.

    6. Cost per useful piece

    Divide price by the pieces you will actually use — not by the box count. A $94 set with eleven useful pieces is $8.54 each; a $60 set with seven useful pieces is $8.57. The headline price and the real price are different numbers, and the gap is where most buying mistakes live.

    7. What to check before buying

    One: the vessel count, separated from accessories. Two: diameter range against your burners. Three: base thickness in millimetres, or the empty weight. Four: whether lids are interchangeable. Five: whether the handles are oven-safe — a riveted stainless handle survives 200 °C, a plastic one does not.

    Honest disclosure: the usage split (6 / 5 / 5) is a typical household pattern, not a measured study of any specific set; the weights and diameters are standard ranges for this class of cookware. Use them as filters, not guarantees.

    8. The three-vessel kitchen

    For two people, three vessels cover almost everything: a 24 cm frying pan with a lid, an 18 cm saucepan, and a 24 cm pot. That is 0.03 m³ of cupboard instead of 0.05, roughly $45–70 instead of $94, and no accessories to lose. The limitation is real — you cannot cook pasta and sauce simultaneously in the same pot — but most weeknight meals need two vessels at once, not four.

    The catch is that buying three good pieces costs more per piece than a set. A decent 24 cm pan alone is $30–50; the set spreads that cost across thin accessories. The honest trade is between quality per vessel and quantity per dollar, and there is no universal answer — only the question you should ask before checkout.

    Frequently asked questions

    Is a 16-piece set better value than buying separately?

    Usually yes at the entry level, because the accessories are cheap to include. But compare cost per vessel: if the set has only five vessels, buying a pan, two saucepans and a pot separately often costs less.

    Do I need every lid?

    No. Two lids that fit multiple vessels do the work of four that fit one each. Check the diameters before counting lids as value.

    Why does a light pan burn food?

    Thin aluminium has little heat capacity, so the surface cools sharply when food is added and the burner cannot recover fast enough. That produces steaming where you wanted searing.

    Can these sets go in the oven?

    Only if the handles and lids are rated for it. Many budget sets are hob-only; check for a temperature rating rather than assuming.

    How many pans does a two-person kitchen need?

    Four vessels: one frying pan, two saucepans and one larger pot. Anything beyond that is a preference, not a requirement.

    Gear referenced in this guide
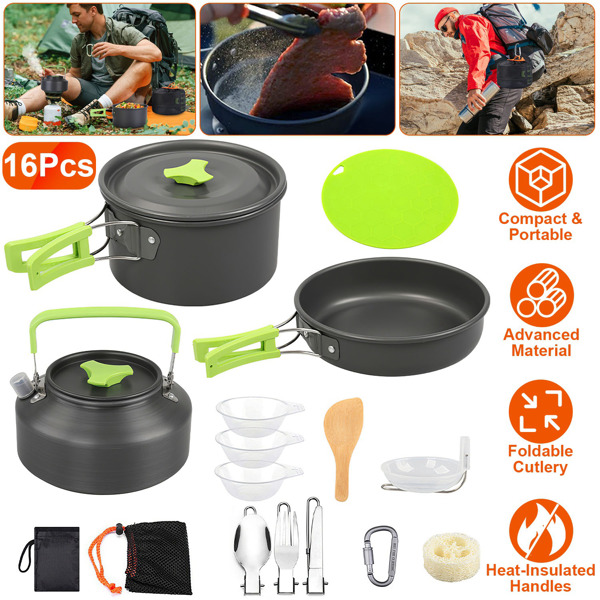
    16 piece camping cookware set

    16 Piece Camping Cookware Set, Outdoor Cooking Kit

    Nested outdoor set: piece count matters less than whether the pieces stack.

    $93.99
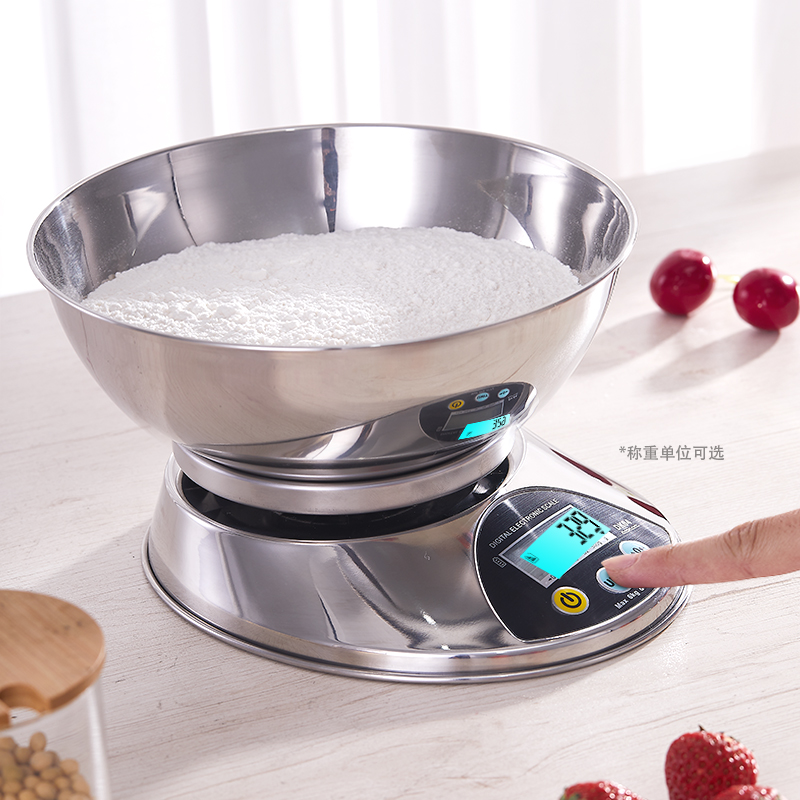
    Kitchen scale with glass platform

    Stainless Steel Kitchen Scale with Tempered Glass Platform

    Weigh a pan before you judge it: 1 g steps resolve the difference between a thin and thick base.

    $72.99
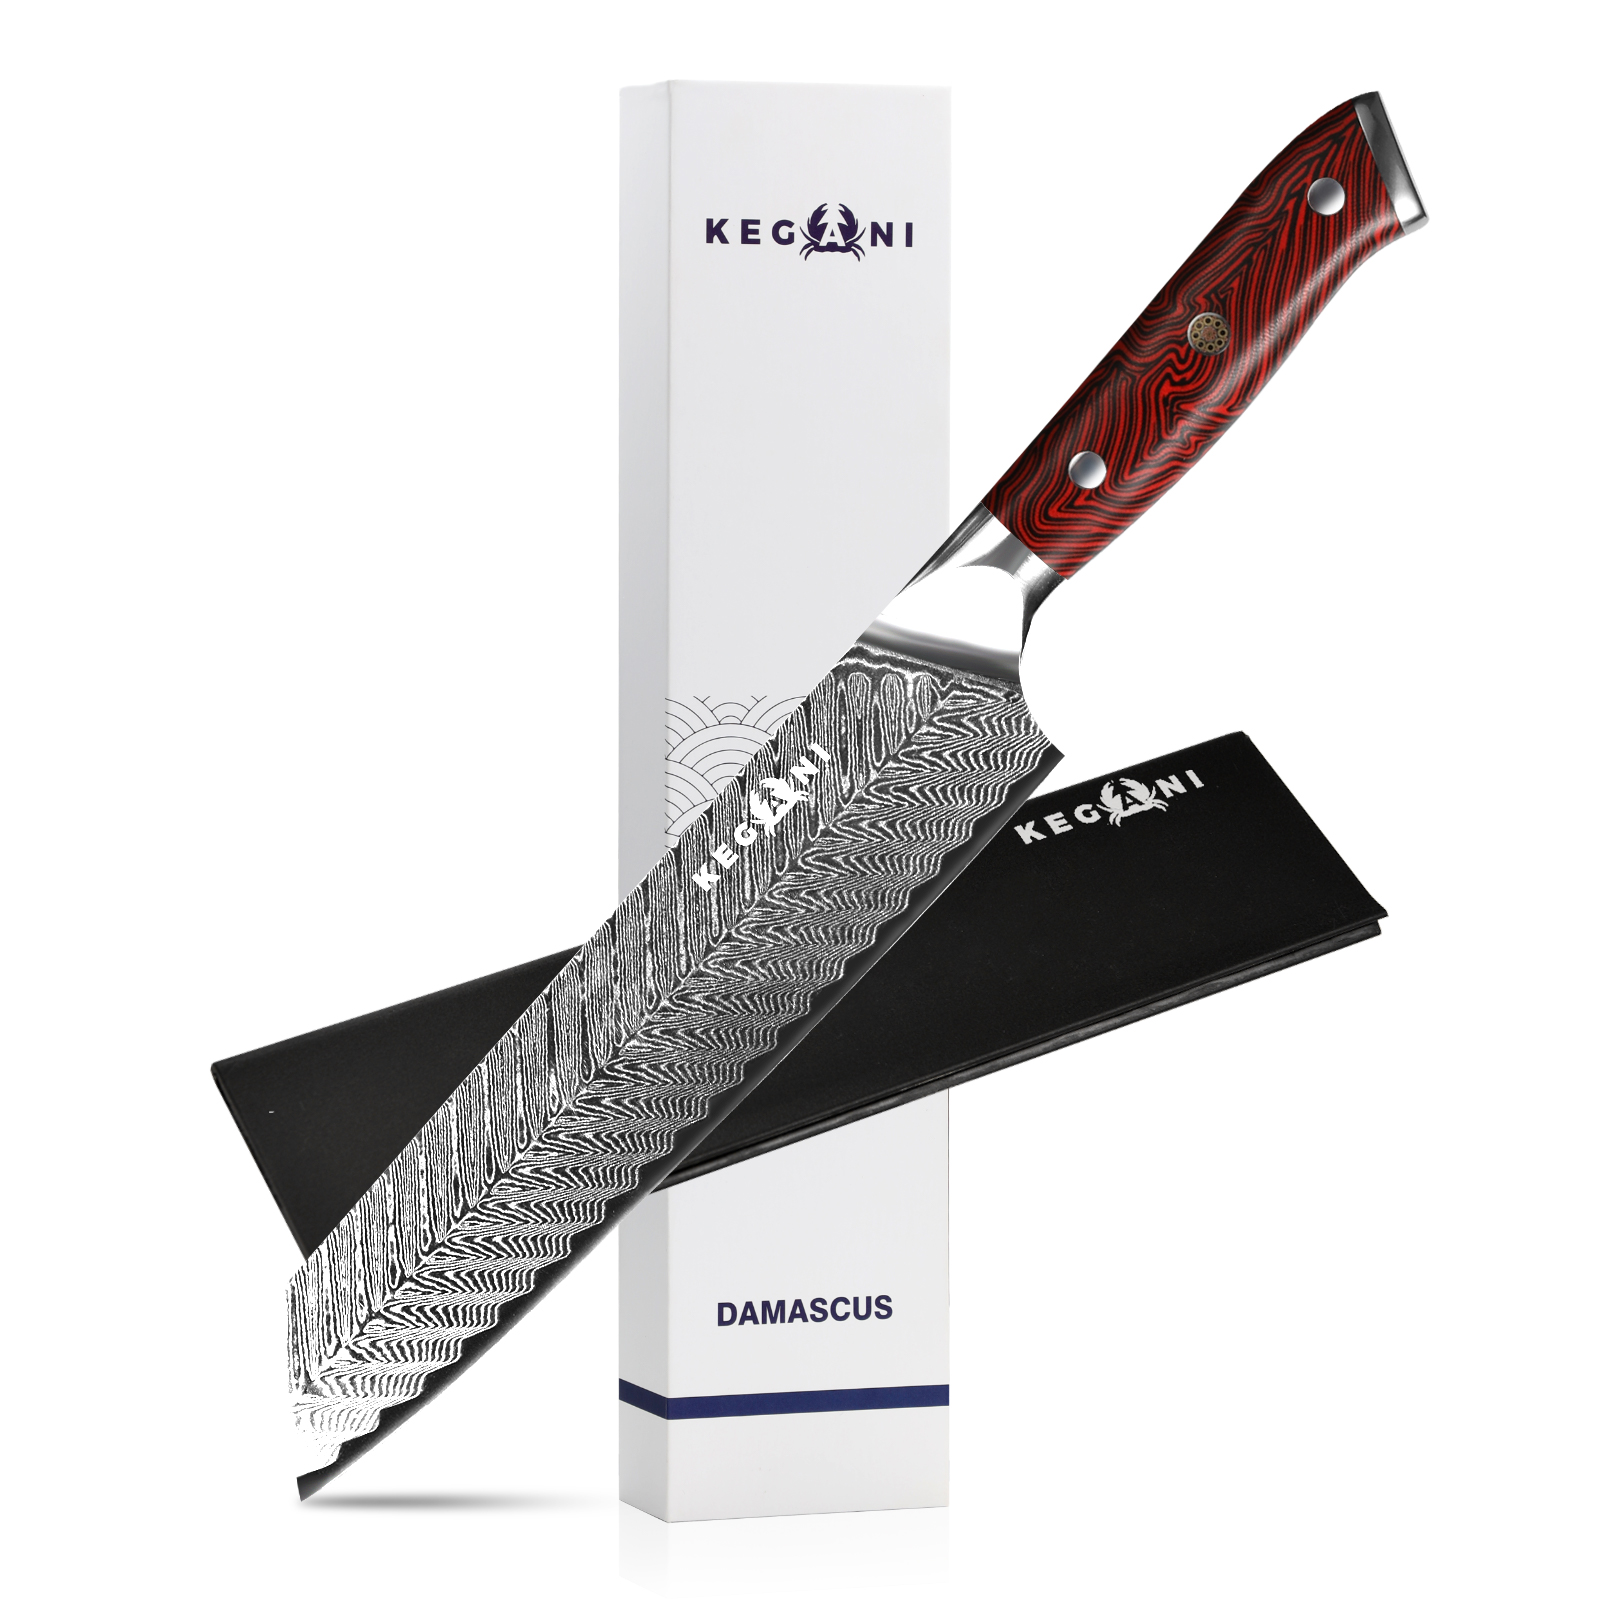
    Damascus steel meat cleaver

    7 Inch Damascus Meat Cleaver, 73 Layers AUS-10 Steel

    73 layers, 7 inch blade — one tool doing one job well beats five doing it badly.

    $102.99
  • What a Boil Costs: 0.15 kWh, Three Minutes and the Price of Impatience

    What a Boil Costs: 0.15 kWh, Three Minutes and the Price of Impatience

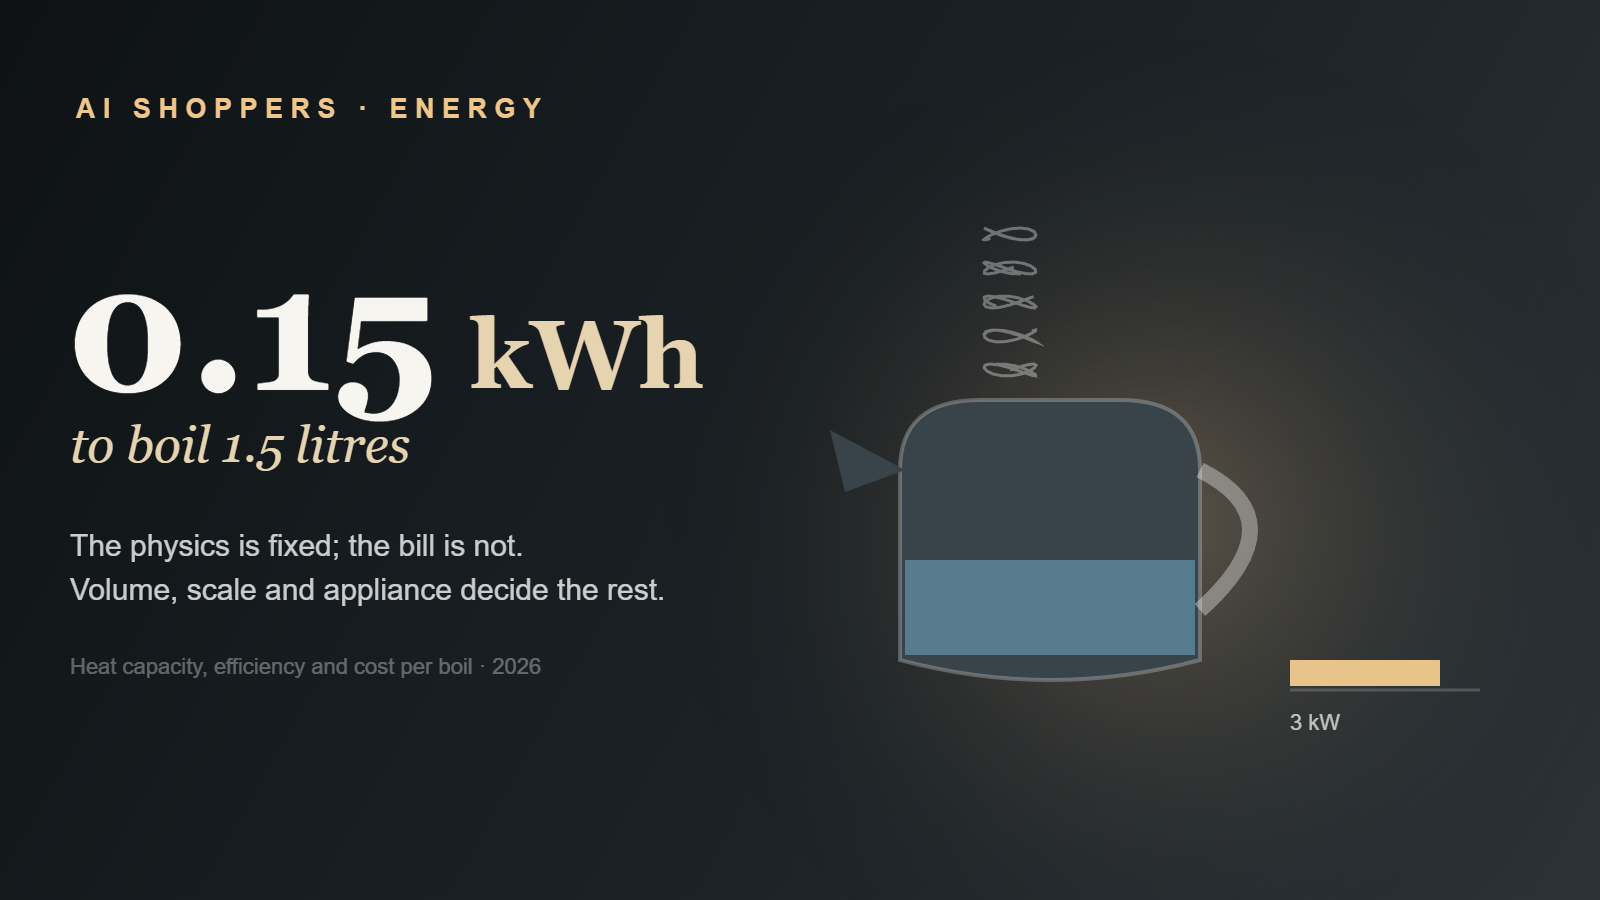
    A kettle with steam and a 3 kW power bar, labelled 0.15 kWh to boil 1.5 litres

    Boiling water is the most repeated energy task in a kitchen, and the least examined. A kettle is a resistor with a thermostat: it converts electricity to heat at close to 100 percent, pours most of that heat into water, and loses the rest to the air and the scale on its element. The arithmetic is short enough to do on paper, and it explains why two households with the same electricity tariff can differ by a factor of three on the same job.

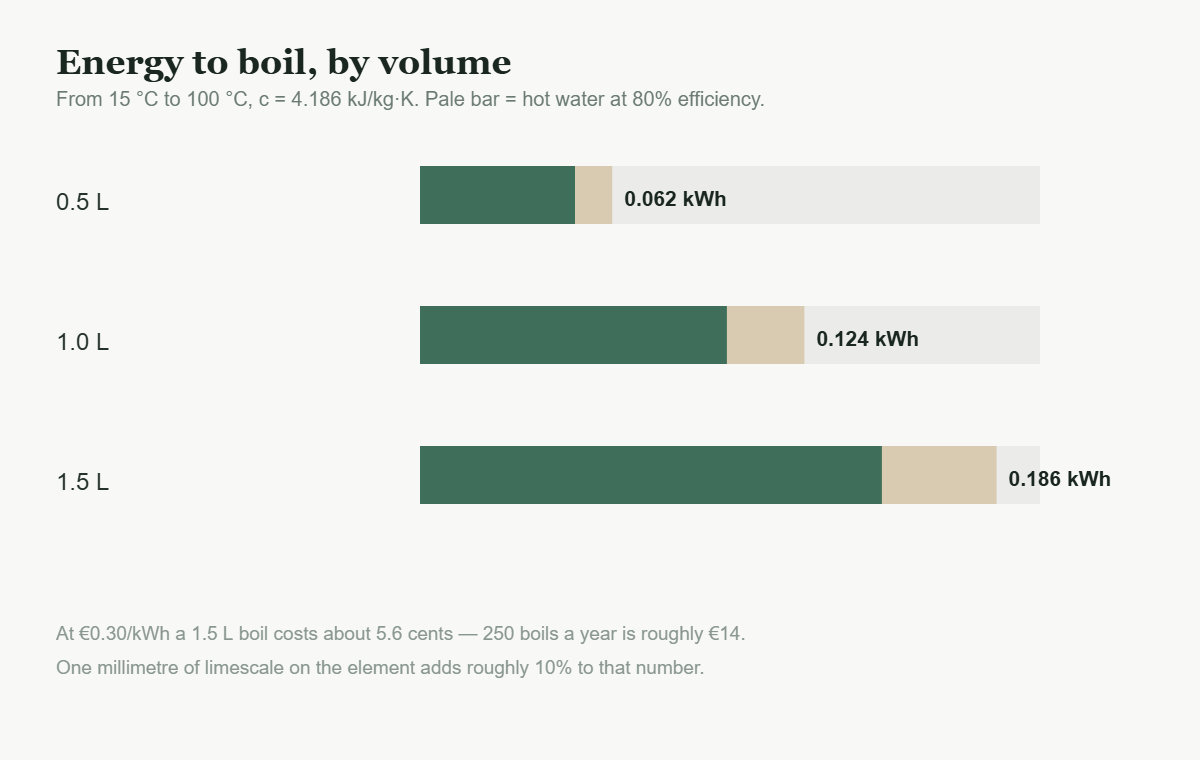
    Here is the number to keep: 1.5 litres from 15 °C to 100 °C requires about 0.148 kWh of heat. With real-world losses, the meter sees roughly 0.19 kWh. Everything else — kettle design, hob type, how much you fill — moves that figure by tens of percent, not by a factor of ten.

    1. The formula, and the four numbers in it

    The energy is Q = m × c × ΔT, where m is mass in kilograms, c is the specific heat of water at 4.186 kJ/(kg·K), and ΔT is the temperature rise. For 1.5 kg and 85 K that is 533.7 kJ, or 0.148 kWh once you divide by 3,600.

    Four numbers decide the result: the volume you actually fill, the starting temperature, the efficiency of the appliance, and the condition of the heating surface. Nothing else has more than a few percent of influence — including the shape of the kettle.

    2. Volume is the only variable you control for free

    Boiling a full 1.5-litre kettle for one cup wastes roughly two-thirds of the energy. Half a litre takes 0.05 kWh of heat instead of 0.15 — a third of the cost for the same tea. If a household boils a full kettle four times a day out of habit, the difference is around 140 kWh a year, which at €0.30/kWh is about €42.

    Weighing water is more precise than eyeballing the window: 1 litre is 1 kg, so a kitchen scale with a 1 g step resolves the fill to a millilitre. It sounds fussy until you see how far off the “minimum” line most kettles actually are.

    3. Appliance efficiency: 80 versus 45 percent

    A modern electric kettle delivers roughly 80 percent of its input to the water; the rest heats the body and escapes as steam. An induction hob with a matched pan reaches about 85 percent. A gas hob is the outlier at roughly 40–50 percent, because most of the flame heats the air around the pot. A microwave is efficient at heating a single cup but poor at a full litre.

    Bar chart of energy to boil half, one and one and a half litres, theoretical and at 80 percent efficiency
    Energy per boil: 0.05 kWh for half a litre, 0.19 kWh for a full kettle at 80% efficiency.

    4. The table

    Method Efficiency Energy for 1.5 L Time Cost at €0.30/kWh
    Electric kettle, 3 kW ~80% 0.19 kWh ~3 min €0.056
    Induction hob, covered pan ~85% 0.17 kWh 5–6 min €0.052
    Gas hob, covered pan ~45% 0.33 kWh 6–8 min €0.099
    Microwave, 1 L max ~60% 0.17 kWh per litre 8–10 min €0.050

    The table explains a common surprise: on a gas hob, the electric kettle is not just faster, it is roughly half the energy. That is a statement about the appliance, not about electricity being cleaner.

    5. Scale is the silent tax

    Limescale is a thermal insulator. A millimetre of scale on an element can add around 10 percent to the energy needed and shorten the element’s life; two millimetres is worse. In hard-water areas this is the single biggest efficiency variable in the whole calculation, and it is fixable with a descaling cycle every few months — citric acid, twenty minutes, no special tools.

    You can measure the effect: fill the same volume twice, once before descaling and once after, and compare the time to boil. The thermostat cuts off at the same temperature, so a longer boil is energy going somewhere other than the water.

    6. The cost side, done properly

    At €0.30/kWh, a 1.5-litre boil costs about 5.6 cents. At four boils a day, that is roughly €82 a year; halving the volume brings it to about €28. The order of magnitude matters more than the cent: boiling water is not a major household cost, but it is a daily one, which makes habits worth more than hardware.

    One caveat: electricity tariffs vary by a factor of three across Europe and more across regions, so plug your own rate into the formula rather than trusting any published figure, including this one.

    7. What this means for equipment

    Buy a kettle with a marked minimum fill and a flat element, and descale it. Buy a scale if you want to hit that minimum precisely. If you cook on gas, the kettle genuinely is the more efficient way to boil water — and a covered pan matters more than the burner setting. None of that requires a smart appliance; it requires knowing which number you are optimising.

    Honest disclosure: the figures above come from standard thermodynamics (c = 4.186 kJ/kg·K) and typical appliance efficiency ranges, not from laboratory tests of the products shown. Your tariff, starting water temperature and scale thickness will move the result.

    8. Starting temperature, and the keep-warm trap

    Tap water arrives at roughly 10–15 °C in winter and 18–22 °C in summer. Starting at 50 °C instead of 15 °C cuts ΔT from 85 K to 50 K — about 41 percent less energy for the same final boil. Filling from the hot tap is not a good way to get there: hot-water tanks and long pipe runs are a source of stagnation and metal pick-up, which is why drinking-water guidance says draw cold and heat it yourself.

    Keep-warm functions are the other hidden cost. Holding a litre at 90 °C takes roughly 0.02–0.05 kWh per hour depending on insulation — small per hour, but it runs all day. A kettle that keeps warm for eight hours can spend more energy holding temperature than it used to boil.

    Frequently asked questions

    Does a higher-wattage kettle use more energy?

    No — it uses the same energy, faster. A 3 kW kettle boils in about three minutes; a 1.5 kW kettle takes twice as long for the same kWh, though it loses slightly more heat to the surroundings.

    Is it cheaper to boil water in a microwave?

    For a single cup, often yes because there is less wasted heat mass. For a litre or more, a kettle wins on both time and total energy.

    Does the kettle’s shape matter?

    Only marginally. A taller, narrower body reduces surface area, but the difference is a few percent — far smaller than fill volume or scale.

    How often should I descale?

    In hard water, every two to three months; in soft water, twice a year. If the boil takes noticeably longer than it used to, descale now.

    Do I need to measure water with a scale?

    Not strictly. But 1 litre is 1 kg, and a 1 g scale resolves the fill precisely, which is the only free variable in the calculation.

    Further reading

    Related: what a 1 g scale can and cannot measure, and why 60 percent humidity is the number that matters indoors.

    Gear referenced in this guide

    Kitchen scale with glass platform

    Stainless Steel Kitchen Scale with Tempered Glass Platform

    1 g steps, 5 kg capacity: weigh the water instead of guessing the line.

    $72.99

    Camping cookware set

    16 Piece Camping Cookware Set, Outdoor Cooking Kit

    For stovetop boiling, a lid does more for efficiency than a bigger burner.

    $93.99

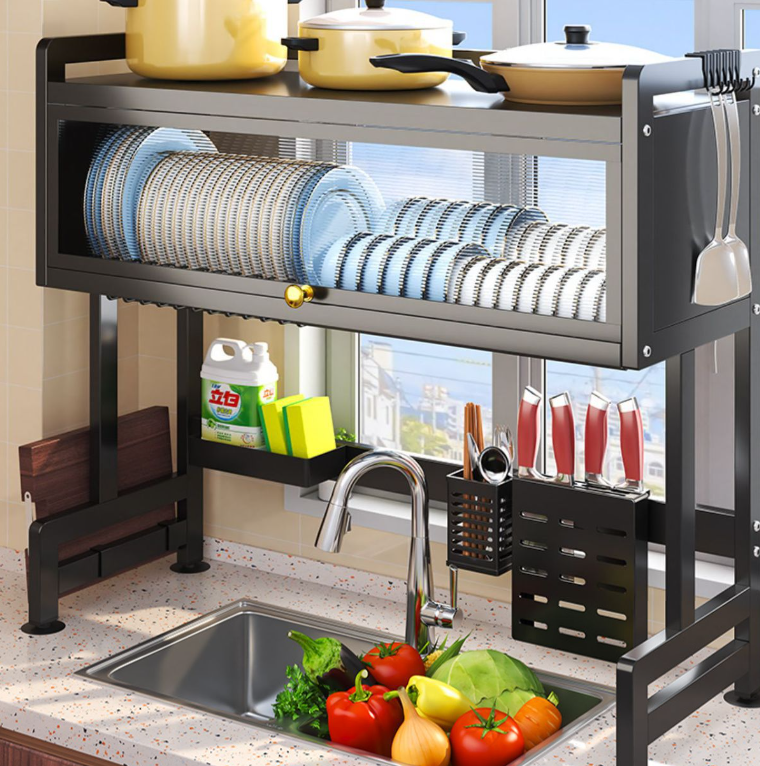
    Kitchen sink caddy

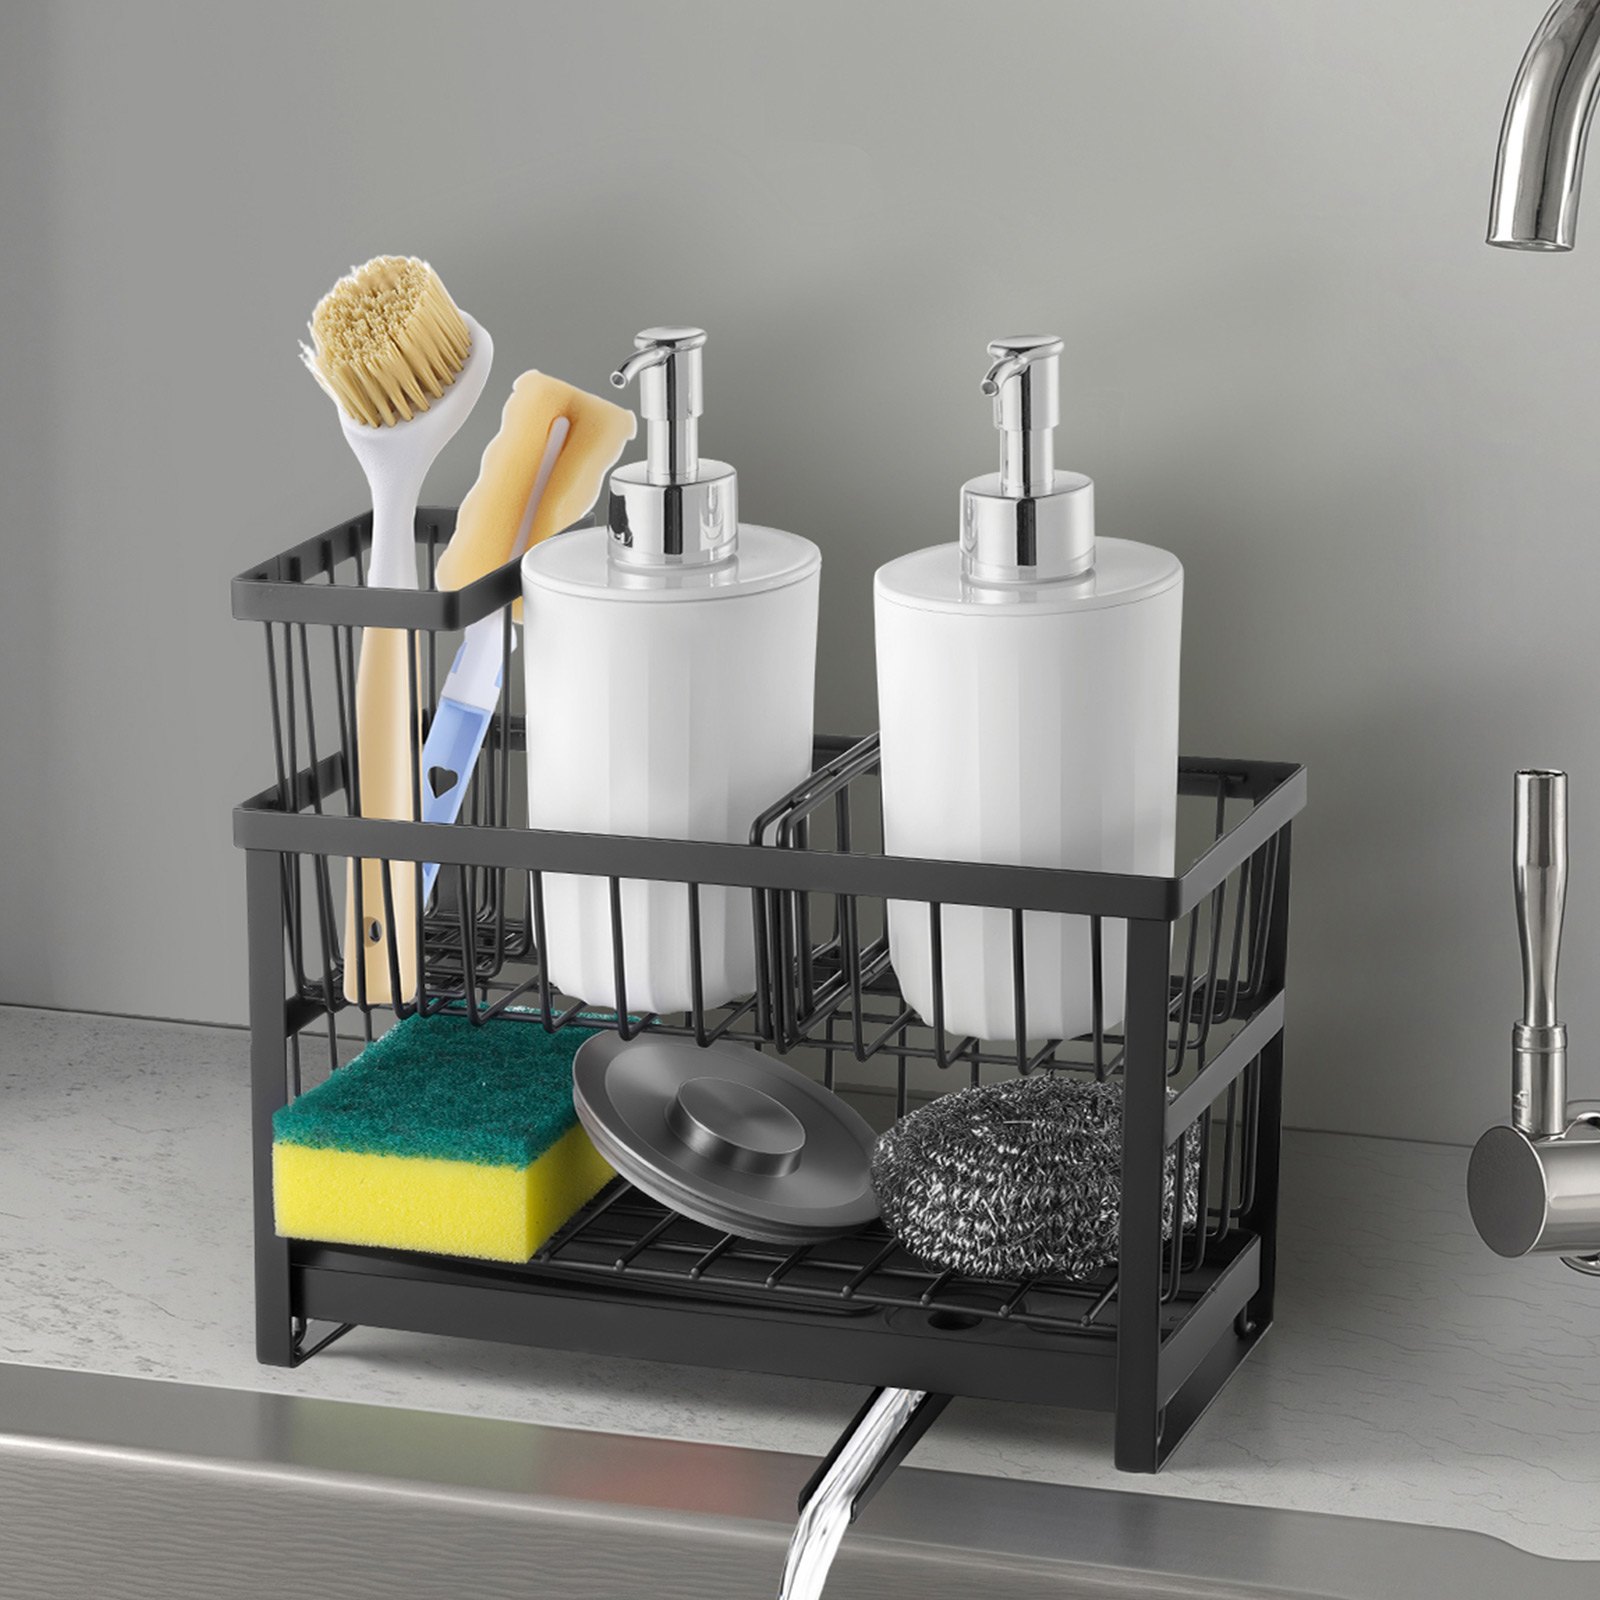
    Kitchen Sink Caddy Organizer, Sponge and Brush Holder

    Keeps the counter dry — the unglamorous half of kitchen efficiency.

    $65.99

  • 304 or 316? What Salt Actually Does to Stainless Steel in a Kitchen

    304 or 316? What Salt Actually Does to Stainless Steel in a Kitchen

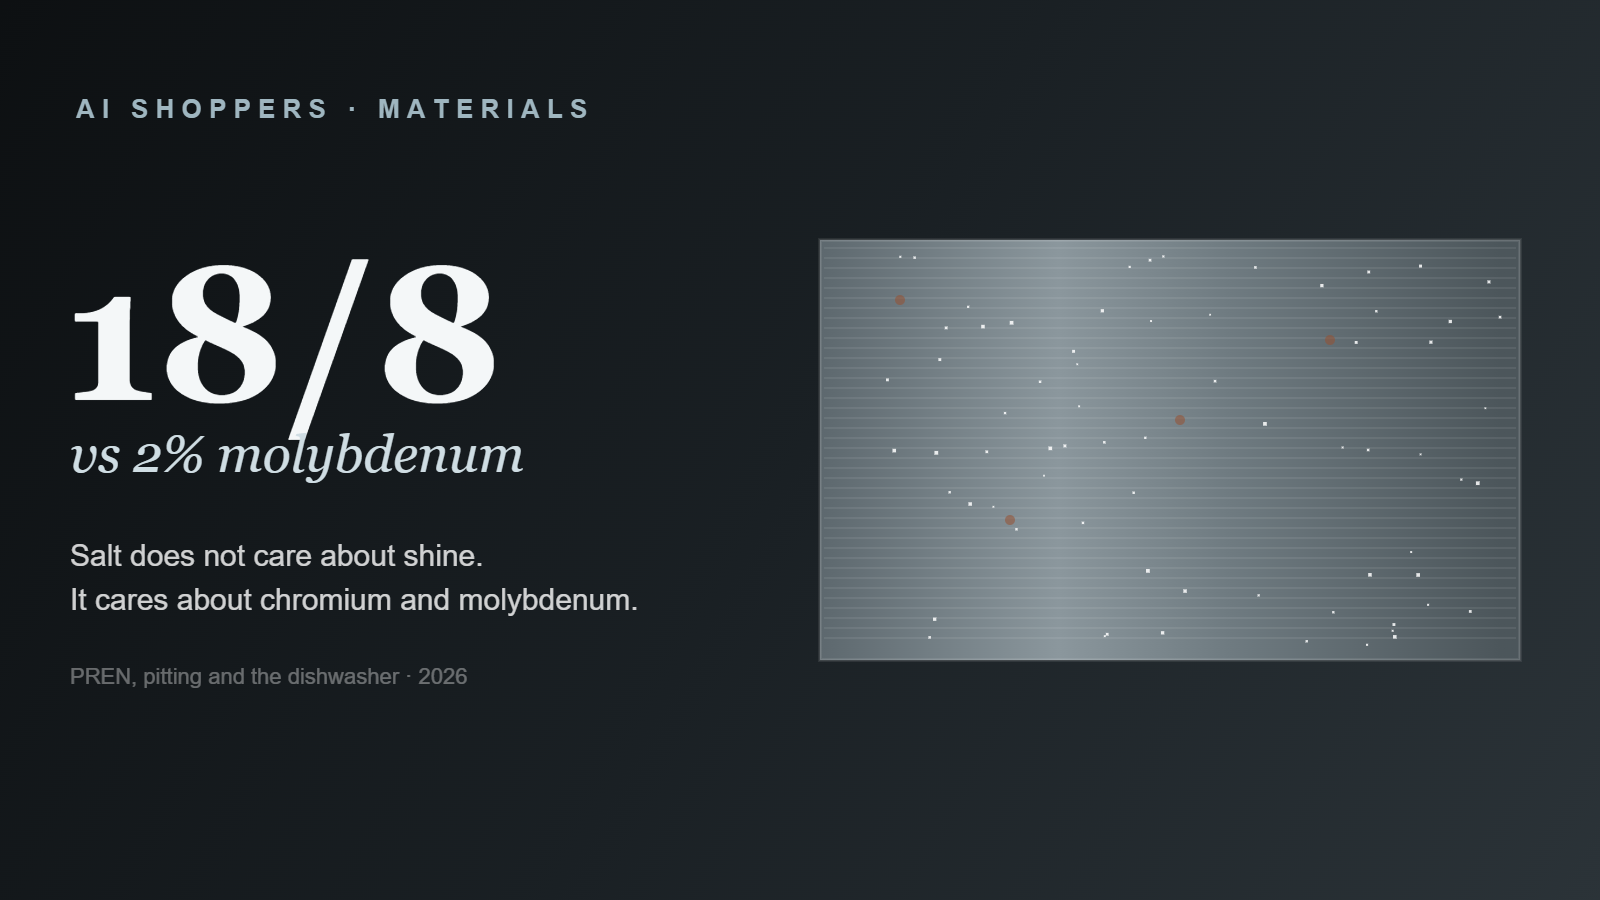
    Brushed stainless steel panel with salt crystals and pit marks

    Stainless steel is not a metal; it is a family. The two grades sold most often into kitchens are 304 and 316, and the difference between them is one element: molybdenum, about 2 percent by weight in 316 and zero in 304. That 2 percent decides whether a sink caddy shows brown pits after two years of dish soap and salty pasta water, or after ten.

    You cannot see the difference, feel it, or test it with a magnet. You can only read the grade — and most listings do not print one. Here is what the numbers actually mean.

    1. What “18/8” actually says

    304 is the grade most people mean by “stainless”: roughly 18 percent chromium and 8 percent nickel, hence the old shorthand 18/8. Chromium is the active ingredient — it forms a passive oxide layer a few nanometres thick that seals the surface and re-forms within seconds when scratched, as long as oxygen is present.

    316 keeps about 16 percent chromium, raises nickel to 10 percent, and adds 2 percent molybdenum. The chromium still does the sealing; the molybdenum specifically improves resistance to chlorides — salt. That is the whole story, and it is why marine hardware is 316 and kitchen trolleys are 304.

    2. PREN: one number that predicts pitting

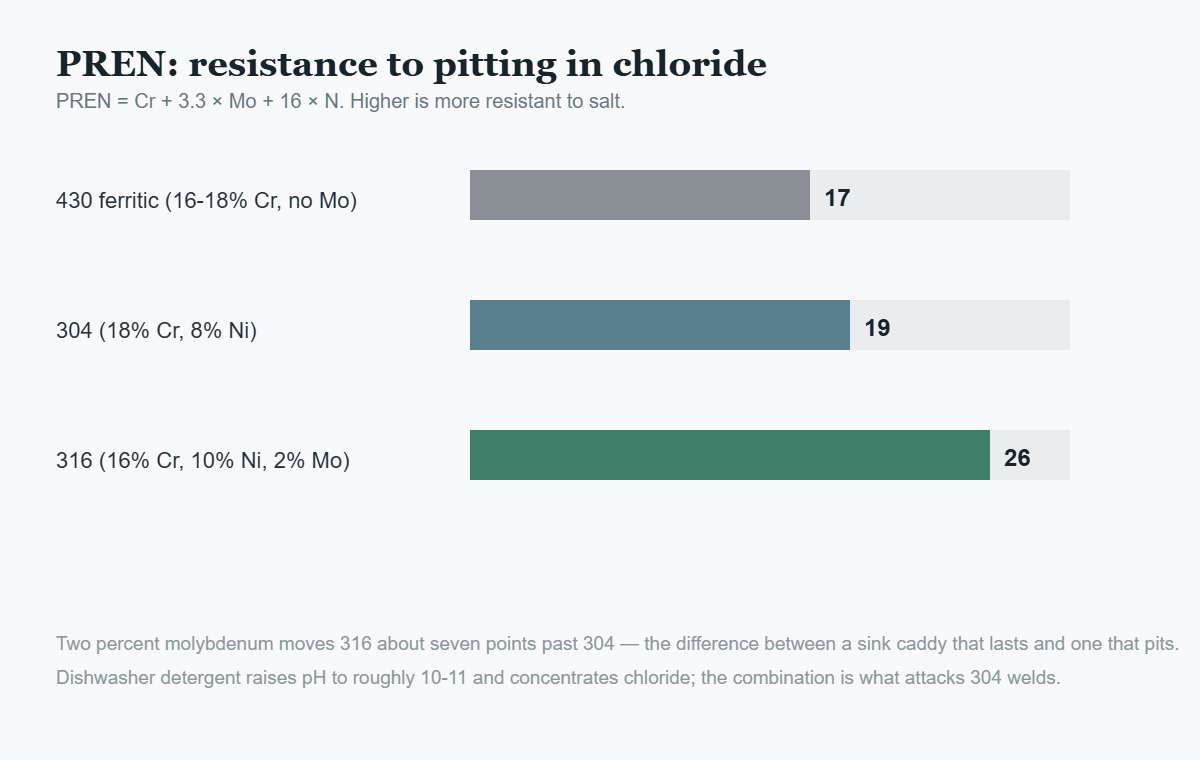
    Metallurgists compare grades with the pitting resistance equivalent number: PREN = Cr + 3.3 × Mo + 16 × N. For 304 that lands around 19. For 316, the molybdenum term adds roughly 6.6 points, putting it near 26 — about a third more resistance to chloride pitting.

    Bar chart of PREN values for 430, 304 and 316 stainless steel
    PREN by grade: 430 about 17, 304 about 19, 316 about 26.

    PREN is a ranking, not a guarantee. A 304 part with a rough weld and trapped salt can pit before a well-finished 316 part sees any damage — surface finish and cleaning matter as much as the grade.

    3. Where a kitchen actually attacks steel

    Three mechanisms do the damage. Chlorides (salt, some detergents, bleach) break down the passive layer locally and start a pit. Acids (tomato, vinegar, citrus) attack it uniformly if left for hours. And heat plus detergent in a dishwasher raises the stakes: dishwasher detergent runs at roughly pH 10–11 and often contains chloride, while the drying cycle concentrates whatever is left on the surface.

    Welds are the weak point. Welding burns out chromium near the seam and leaves a rougher microstructure; if that area is not passivated — cleaned with citric or nitric acid to restore the oxide layer — it will be the first place to rust even on 316.

    4. The table

    Grade Chromium / nickel Molybdenum PREN Where it belongs
    430 ferritic 16–18% / 0% none ~17 Appliance panels, dry interiors; magnetic
    304 ~18% / ~8% none ~19 General kitchen tools kept dry
    316 ~16% / ~10% ~2% ~26 Sink area, salt water, marine hardware

    A magnet is a rough grade test: 430 is strongly magnetic, 304 is essentially non-magnetic, 316 is non-magnetic. It will not tell 304 from 316 — for that you need the stamp or the spec sheet.

    5. What this means for buying

    Match the grade to the wetness, not the price. A sink caddy that sits in a puddle every day is the hardest job in the kitchen; if the listing says only “stainless steel”, assume 304 and expect to dry it. A colander or a bowl that is rinsed and dried can be 304 for a decade without a mark. A knife is different again — cutlery steels trade corrosion resistance for edge retention.

    Rough rule: if the item will hold standing water or salt, pay for 316 or accept a shorter life. If it only touches water briefly, 304 is enough. Never pay 316 prices for a part that is stamped 18/8 — that is 304.

    6. Care that actually prevents pitting

    Dry the item rather than letting it air-dry in a puddle; rinse salt off within the hour; skip bleach-based cleaners on steel; and use a citric-acid passivation wipe on any weld or scratch once a year. Avoid steel wool, which embeds free iron that then rusts on its own.

    None of this is exotic. The reason stainless fails is almost always the same: chloride plus time plus a wet contact surface.

    7. Why the L matters

    You will see 316L more often than 316 on anything welded. The L means low carbon — capped at about 0.03 percent instead of 0.08. Carbon is what combines with chromium at weld seams to form chromium carbide, pulling chromium out of the passive layer exactly where the metal was hottest. Lower carbon leaves more chromium available, so a welded 316L joint resists pitting where a standard 316 weld might not.

    For a sink caddy or a rack made from bent wire, this matters: every bend and weld is a place where the oxide layer has to rebuild. If a listing says “316” without the L on a welded product, ask which one — the difference shows up in year three, at the joint, not on the flat surface.

    8. Reading the listing

    Three phrases are worth translating. “18/10” means roughly 18 percent chromium and 10 percent nickel — usually a 304-family grade upgraded for shine, not a 316. “Surgical steel” has no legal definition and is marketing. “Food grade” describes a finish and a test, not a grade: 304 and 316 can both be food grade, and 430 can be too for dry contact.

    The only reliable markers are the grade number (304, 316, 316L, 430) and, for welded parts, a passivation statement. Anything else is a description of appearance, and appearance is exactly what salt ignores.

    9. Salt spray, and why the hours confuse people

    Spec sheets often quote salt spray hours from ASTM B117: 24, 72, 200, 500. The number is not a lifetime — it is the time to first visible corrosion in a 5 percent salt fog at 35 °C. A 304 part might show first rust between roughly 24 and 72 hours depending on finish; a well-passivated 316 part commonly reaches several hundred. Compare only within the same test and the same finish, and treat the number as a ranking, not a warranty.

    Frequently asked questions

    Is 304 worse than 316?

    For salt and chlorides, yes — roughly a third lower pitting resistance by PREN. For dry general use, the difference rarely shows within a decade.

    Why did my “stainless” caddy rust in a year?

    Usually chloride pitting at a weld or under a rubber foot where water sits. Grade and passivation both matter; trapped moisture is the accelerant.

    Can I use a dishwasher for stainless?

    Generally yes, but repeated cycles with high-chloride detergent are the hardest environment in a home. Hand-drying extends life noticeably.

    Does a magnet tell me the grade?

    Only broadly. 430 is magnetic; 304 and 316 are not. A magnet will not separate 304 from 316.

    What is passivation?

    A cleaning step — citric or nitric acid — that removes free iron from a surface and lets the chromium oxide layer rebuild. It is standard after welding.

    Honest disclosure: the composition and PREN figures are standard published values for these grades; actual performance depends on surface finish, welding, passivation and the specific chloride exposure. Nothing here is a lab test of the products shown.

    Gear referenced in this guide

    Kitchen sink caddy with sponge holder

    Kitchen Sink Caddy Organizer, Sponge and Brush Holder

    The wettest spot in the kitchen: check the grade before you buy, and dry it after use.

    $65.99

    Over-basin sink storage rack

    Kitchen Sink Storage Rack, Over-Basin Bowl and Sponge Drainer

    Keeps bowls and sponges draining instead of standing in water — the cheapest anti-pitting measure.

    $65.99

    Kitchen scale with stainless platform

    Stainless Steel Kitchen Scale with Tempered Glass Platform

    Stainless platform, dry use: exactly the case where 304 is entirely sufficient.

    $72.99

  • Why Cheap Cookware Weighs Less: Aluminium Gauge, Cladding and Heat Spread

    Why Cheap Cookware Weighs Less: Aluminium Gauge, Cladding and Heat Spread

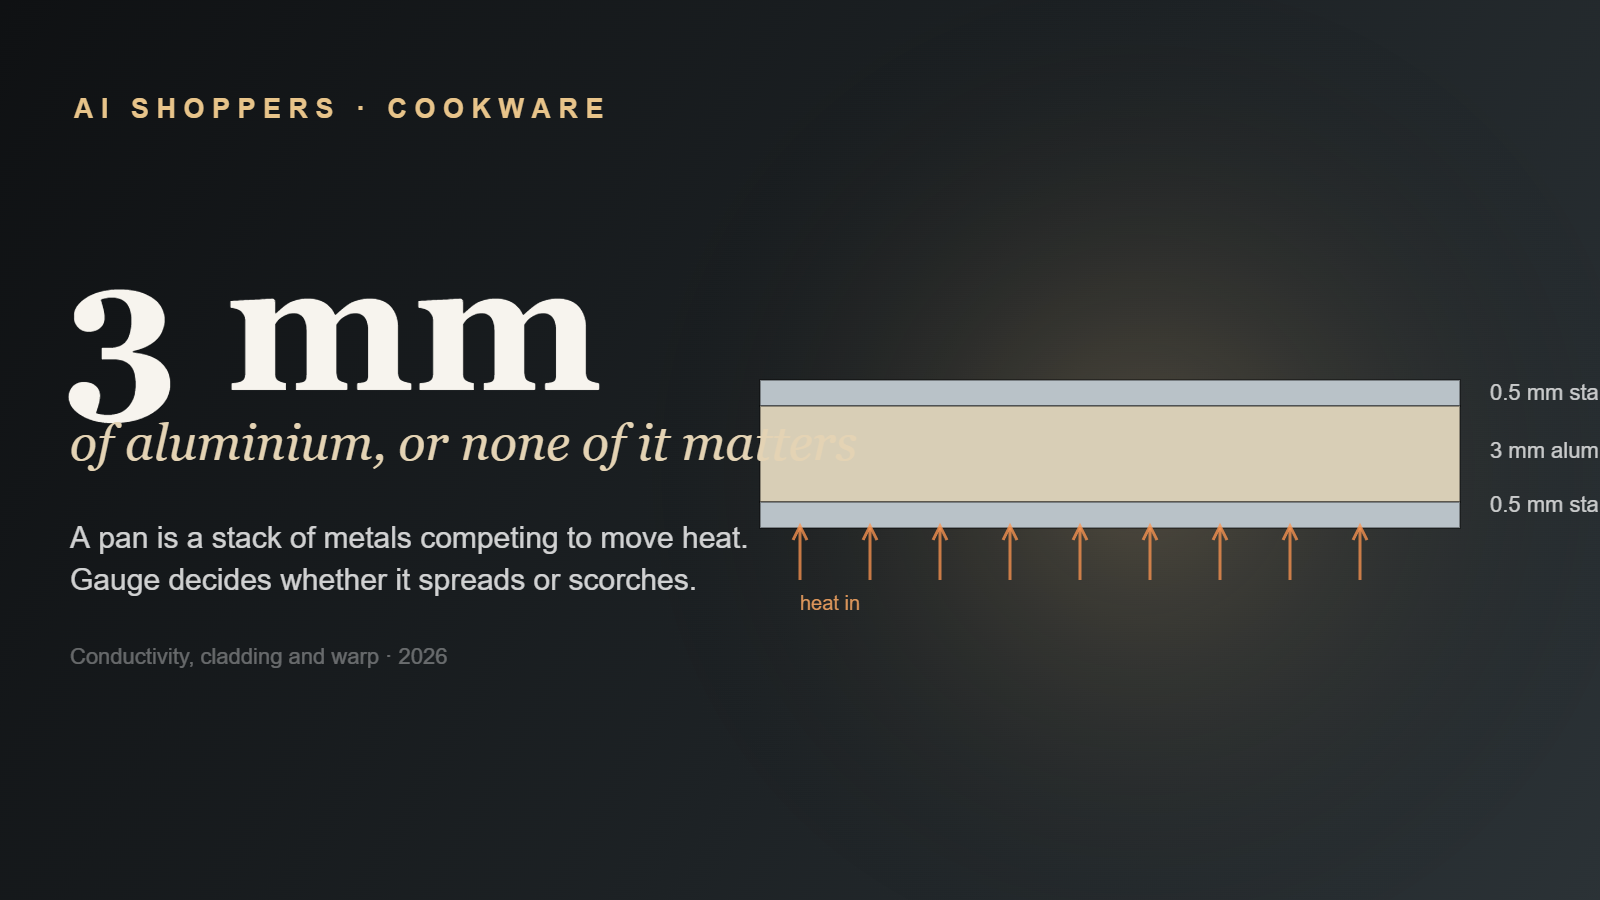
    Cross-section of a clad pan: two stainless skins around a 3 mm aluminium core

    Two frying pans, same diameter, same colour, same non-stick claim. One weighs 850 g and costs $60; the other weighs 420 g and costs $18. The difference is almost entirely in a layer you cannot see: the aluminium core. It is either 3 mm thick, or it is 1.2 mm thick with a lot of marketing on top of it.

    That thickness decides three things you will notice within a week — how evenly the pan heats, how quickly it recovers when food goes in, and whether the base stays flat after a hot sear. None of them appear on the package.

    1. A pan is a stack of metals

    Clad cookware is a sandwich. A typical three-ply is 0.5 mm stainless, 3 mm aluminium, 0.5 mm stainless, bonded under pressure. The stainless gives you a non-reactive, dishwasher-safe surface; the aluminium does the heat moving. Five-ply adds copper or more aluminium and costs accordingly.

    Cheap pans skip the sandwich. They are stamped from a single sheet of 1.2–1.5 mm aluminium, coated, and sold. That is not automatically bad — a thin aluminium pan is light and heats fast — but it stores very little heat, so the moment cold food lands, the surface temperature drops and the pan has to catch up.

    2. The numbers behind “heats evenly”

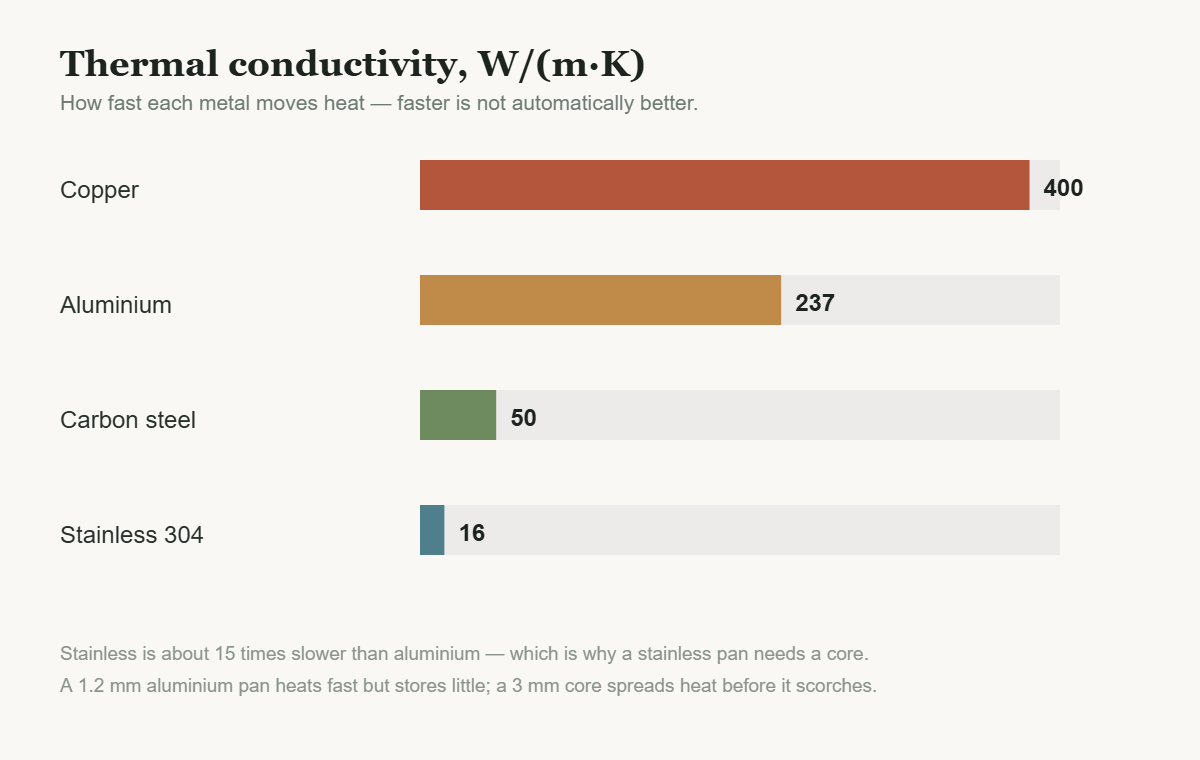
    Thermal conductivity tells you how fast heat moves through a metal: copper about 400 W/(m·K), aluminium 237, carbon steel 50, stainless 304 around 16. Stainless is roughly fifteen times slower than aluminium, which is exactly why a stainless pan needs an aluminium or copper core — on its own it would scorch in the centre and stay cold at the rim.

    Bar chart of thermal conductivity for copper, aluminium, carbon steel and stainless steel
    Conductivity in W/(m·K): the reason a stainless pan is always a composite.

    Thickness matters as much as the material. Heat spreads sideways through a plate at a rate that grows with thickness; a 3 mm core moves heat outward fast enough that a 20 cm pan reads within a few degrees from centre to edge. A 1.2 mm base manages a hot ring and a cooler rim — the classic “hot spot” that browns one part of the pancake and leaves the rest pale.

    3. Heat capacity: why a heavy pan forgives you

    Thicker aluminium also stores more heat. Put a 200 g steak into a thin pan and the surface can drop 60–80 °C before the burner catches up; in a 3 mm pan the drop is smaller and recovers faster, which is why the steak sears instead of steaming. The trade is weight and warm-up time: a heavy pan takes two to three minutes longer to reach temperature.

    Construction Base thickness Heat spread Recovery after cold food Typical weight (20 cm)
    Stamped aluminium, coated 1.2–1.5 mm Uneven, hot centre Slow 350–450 g
    3-ply clad (SS/Al/SS) 3 mm core Even Good 700–900 g
    5-ply with copper 3–4 mm Very even Best 900–1,200 g
    Cast iron 4–6 mm Slow to spread, huge storage Excellent 1,400–2,000 g

    4. Warping and thermal shock

    A thin base warps because the cooking surface and the flame side expand at different rates. Above roughly 250–300 °C, a 1.2 mm aluminium disc can take a permanent set — the pan starts spinning on the hob and never sits flat again. Thick clad bases resist this, but they can delaminate if quenched: pouring cold water into a 250 °C pan stresses the bond. Let it cool for two minutes first.

    Induction adds a separate constraint. Induction heats only magnetic material, so an aluminium pan needs a steel disc bonded into the base. If the base is not magnetic, a magnet will not stick — a five-second test that saves a return.

    5. Five checks before buying

    One: weight relative to diameter. A 20 cm pan under 500 g is a thin stamp, whatever the listing says. Two: base thickness, stated in millimetres rather than “heavy duty”. Three: layer construction, e.g. “3-ply 18/10 + aluminium core”. Four: induction compatibility claimed explicitly, with a magnetic base. Five: handle fixing — rivets beat screws, and a riveted stainless handle survives oven use that a plastic one will not.

    Care follows the construction: no quenching, no dishwasher for bare aluminium, medium heat for non-stick, and a flat-bottom check with a straight edge once a year. A clad pan treated this way lasts a decade; a thin one is a two-year consumable.

    6. What the coating changes

    Non-stick adds a fourth variable. PTFE coatings are typically 20–40 µm thick and are rated to about 260 °C; above that they degrade and release fumes that are harmful to pet birds and unpleasant for people. Ceramic (sol-gel) coatings tolerate higher heat — often 400 °C — but they lose their release properties faster, commonly within 12–24 months of daily use.

    The practical consequence is that coating and core should be matched. A 3 mm clad pan with a good PTFE layer will outlast three thin pans with the same coating, because the thick base keeps the surface below the degradation temperature: a thin pan run at high heat spikes well past 260 °C at the hot spot even when the thermostat says medium.

    Cast iron and carbon steel skip the coating entirely. They need seasoning, tolerate 300 °C and above, and are effectively repairable — which is why a $30 skillet can outlive a $90 non-stick pan.

    7. The money question

    Divide price by years of service and the ranking flips. An $18 thin pan replaced every two years costs $9 a year; a $60 clad pan lasting eight years costs $7.50, and it cooks better in year six than the cheap one did in month three. The same arithmetic applies to the 16-piece outdoor set: thin walls are correct there because weight is the constraint, not longevity.

    Frequently asked questions

    Is heavier cookware always better?

    No. Cast iron is heavy and slow to respond; a 3 mm clad pan is heavy but responsive. What matters is mass in the base, not the total — a heavy handle tells you nothing.

    Can I use aluminium pans on induction?

    Only if a magnetic steel layer is bonded into the base. Pure aluminium is not magnetic, so induction cannot heat it directly.

    Why does my pan spin on the hob?

    The base has warped, usually from overheating or quenching. Set it on a flat surface and press one edge: any rocking means permanent deformation.

    Does a copper core make a real difference?

    It improves spread and response, but copper is roughly 1.7 times more conductive than aluminium and much heavier and costlier. At 3 mm, the difference is subtle for home cooking.

    How thick should a stainless pan’s core be?

    For a 20–24 cm pan, 2.5–3 mm of aluminium is the sensible minimum; below 2 mm the hot-spot problem returns even in clad construction.

    Honest disclosure: the conductivity values are standard handbook figures for the pure metals and 304 stainless; real cookware uses alloys and composites, and thickness varies by product. Use the numbers to compare constructions, not to predict a specific pan’s exact behaviour.

    Gear referenced in this guide

    Sixteen piece camping cookware set

    16 Piece Camping Cookware Set, Outdoor Cooking Kit

    Thin-wall outdoor cookware: light by design, where fast heating matters more than heat storage.

    $93.99

    Damascus steel meat cleaver

    7 Inch Damascus Meat Cleaver, 73 Layers AUS-10 Steel

    73 layers of AUS-10: a different sandwich, this one built for edge retention rather than heat.

    $102.99

    Kitchen scale with glass platform

    Stainless Steel Kitchen Scale with Tempered Glass Platform

    Weigh a pan before you buy: grams per centimetre is the honest measure of base thickness.

    $72.99

  • The One-Gram Problem: What Scale Resolution Actually Changes in Baking

    The One-Gram Problem: What Scale Resolution Actually Changes in Baking

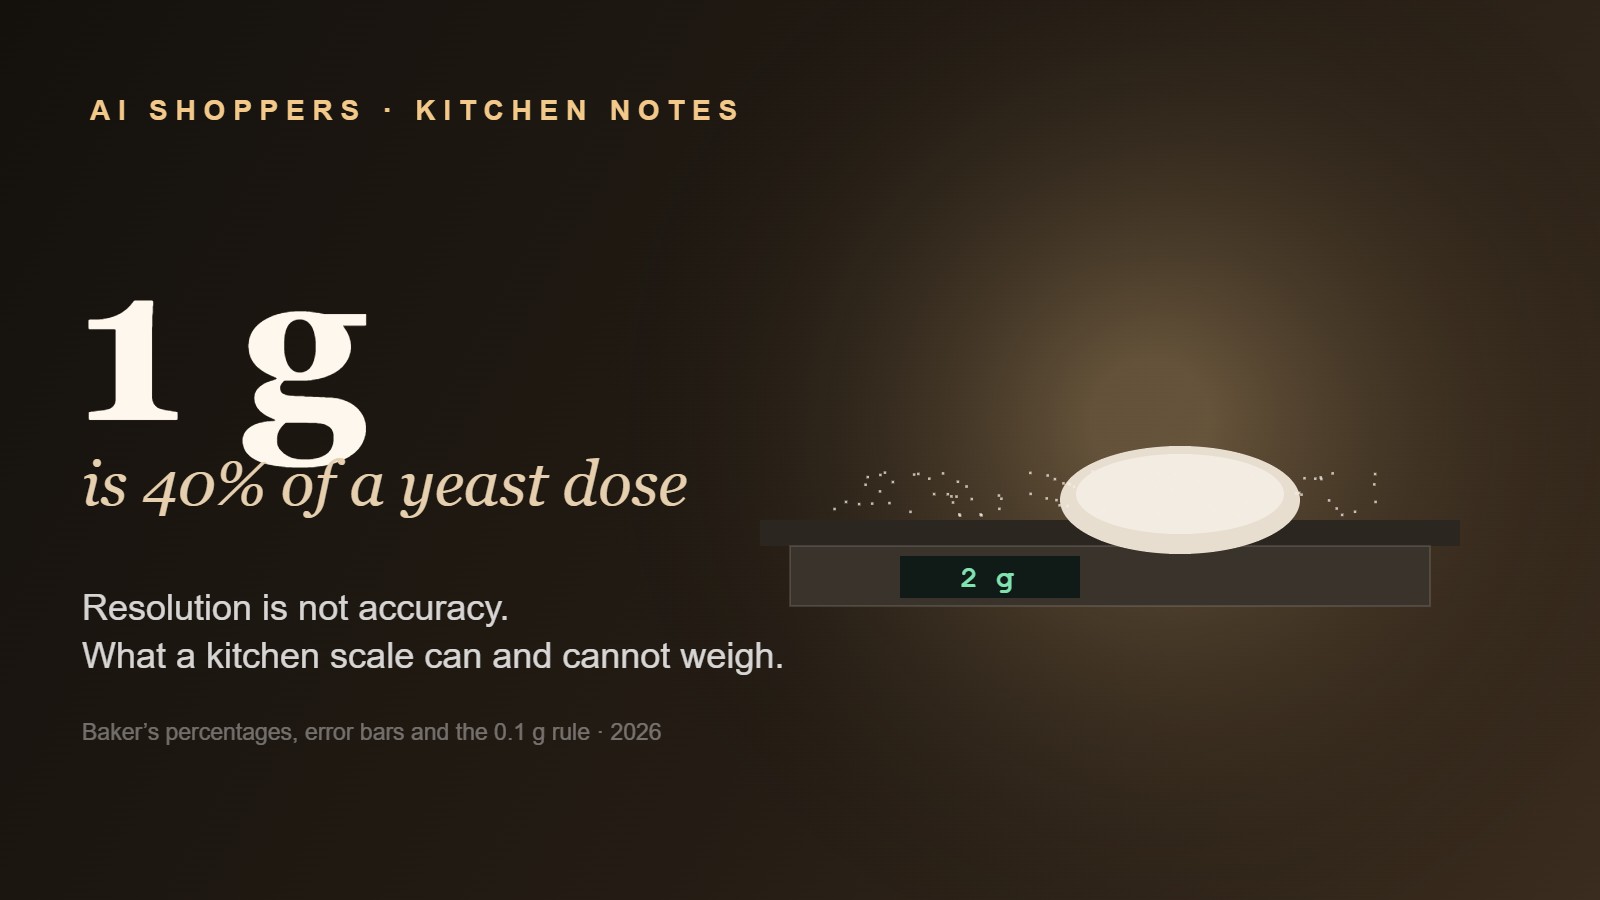
    A kitchen scale reading 2 g beside a bowl of flour

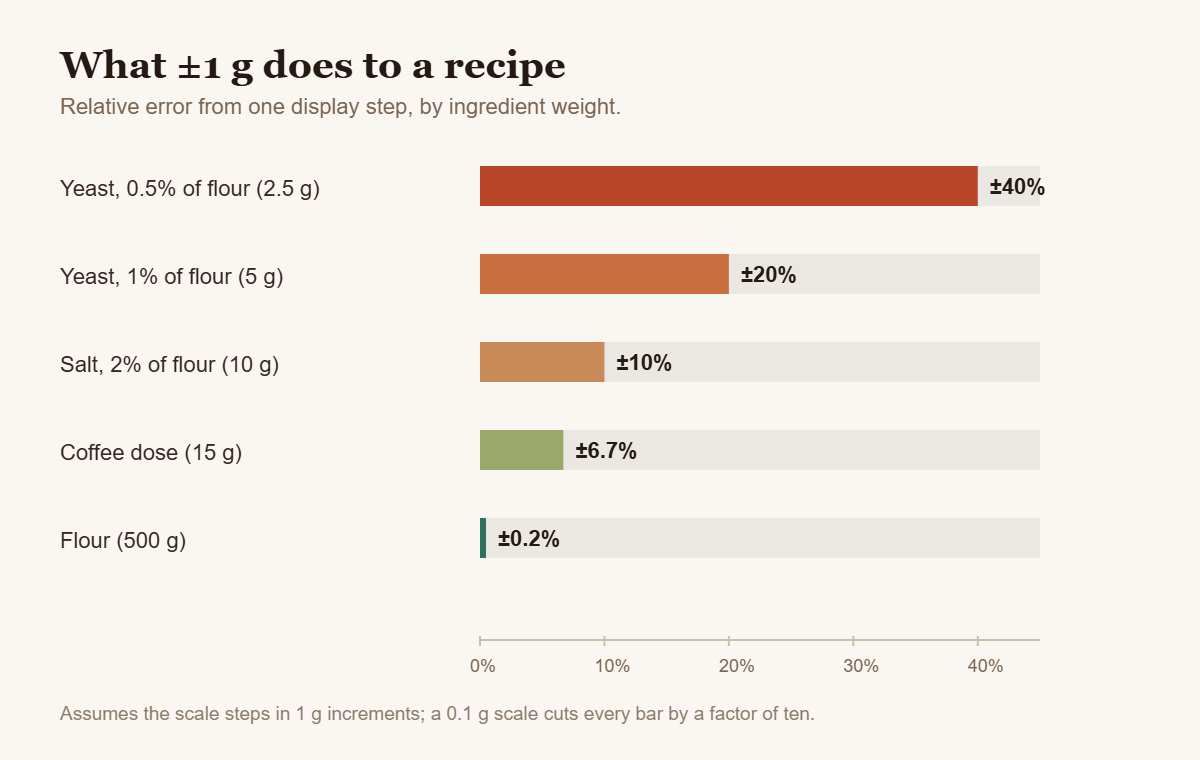
    A kitchen scale that steps in 1 g is accurate enough for bread and useless for yeast. Both statements are true at the same time, and the reason is arithmetic rather than equipment quality: a display step is a fixed quantity, so its relative cost depends entirely on what you are weighing. One gram of flour in a 500 g batch is nothing. One gram of instant yeast in a 2.5 g dose is 40 percent of the ingredient.

    Most baking advice treats scales as either good or bad. The useful question is narrower: at what weight does a 1 g step stop being negligible? That has an answer, and it fits on one page.

    1. Resolution is not accuracy

    Resolution is the smallest change the display can show. Accuracy is how close the reading is to the truth. A scale can display 1 g steps and still be off by 2 g at 500 g, because load cells drift with temperature, off-centre loads and cheap calibration. Factory specs often read something like ±(1 g + 0.1%), which at 500 g means a tolerance of about 1.5 g — larger than the step.

    This matters because home bakers compare displays and assume the difference is precision. It is not. Two scales both showing 1 g can disagree by 3 g at the same load, and neither is broken. What you can control is the step, and the step is what the rest of this article measures.

    2. Baker’s percentages make the error visible

    Professional baking measures everything as a percentage of flour weight. A standard lean dough at 500 g flour looks like this: water 70 percent (350 g), salt 2 percent (10 g), instant yeast 1 percent (5 g). Scale the batch down to 250 g flour and the yeast becomes 2.5 g — a weight smaller than the display step.

    That is the trap. Recipes written in percentages scale cleanly; the scale does not. Halve the batch and the relative error on the smallest ingredient doubles.

    Bar chart of relative error from a 1 gram step for yeast, salt, coffee and flour
    One display step, five ingredients: the same 1 g costs 40 percent of a yeast dose and 0.2 percent of the flour.

    3. The table

    Ingredient Share of flour Weight at 500 g flour Error from a ±1 g step
    Instant yeast 0.5% 2.5 g ±40%
    Instant yeast 1% 5 g ±20%
    Salt 2% 10 g ±10%
    Coffee dose — 15 g ±6.7%
    Bread flour 100% 500 g ±0.2%

    The pattern is a hyperbola: halve the weight, double the relative error. Below about 5 g, a 1 g step is no longer a rounding detail — it is the difference between a 90-minute bulk ferment and a three-hour one, because yeast quantity drives timing more than any other variable in a lean dough.

    4. The 0.1 g rule

    Anything weighed under 5 g belongs on a 0.1 g scale. That covers yeast, salt for small batches, baking powder, citric acid, espresso dose correction and sourdough starter inoculations. A 0.1 g scale is cheap, small, and complements rather than replaces a kitchen scale: the big one handles flour and water, the small one handles the ingredients where one step equals twenty percent.

    The alternative, if you only own a 1 g scale, is to weigh a larger multiple and divide. Ten grams of yeast dissolved in 100 g of water gives a solution where 10 g of liquid carries roughly 0.9 g of yeast — messy for a home kitchen, but it is the standard workaround in small test batches.

    5. Tare, and the error you add yourself

    Tare is not a luxury feature; it is what stops cumulative error. Weighing flour, then taring, then water, then taring again keeps every measurement independent. Weighing everything into one bowl without taring — or worse, guessing the bowl weight — adds a separate error of 50–300 g depending on the bowl, which dwarfs the 1 g discussion entirely.

    Two practical habits: put the bowl on the scale before switching it on so the zero is real, and never trust a scale that powers off mid-recipe. Auto-off timers of 60–120 seconds are common and will silently reset your cumulative total.

    6. Coffee is the same arithmetic with better margins

    A 15 g espresso dose with a 1:16 ratio needs 240 g of water. One gram on the dose is 6.7 percent, which is roughly the difference between a 25-second and a 29-second shot — noticeable but survivable. One gram on 240 g of water is 0.4 percent, invisible. So the dose matters far more than the brew water, and it is exactly where a 1 g step is borderline.

    For pour-over at 15 g per 250 g, the same logic applies: control the dose to ±0.5 g with a 0.1 g scale, and let the water go where it wants.

    7. What actually matters when buying

    Capacity first: 5 kg handles a mixing bowl, a stockpot and a bag of flour. Resolution second: 1 g is right for a general kitchen scale, 0.1 g for a pocket scale. Platform size third: a 15 × 15 cm platform with a 20 cm bowl is unstable, and instability reads as drift. Then repeatability — put the same 100 g weight on three times and check the display does not wander. Tare and a hold function matter more than any extra unit conversions.

    Finally, ignore the marketing phrase “high precision”. Ask for the step and the tolerance separately. If the listing gives only one number, it is the step.

    8. Where 1 g genuinely does not matter

    Hydration is the clearest case. A dough at 70 percent hydration on 500 g of flour needs 350 g of water; shifting that by 1 g moves hydration by 0.2 percentage points, which no baker can feel. Even a 10 g error — a splash too much — moves it by 2 points, and most flours absorb within a range of several points depending on protein content and age.

    Batch size decides which errors matter. Double the recipe and the yeast goes to 10 g, where a 1 g step is 10 percent; double it again and the same step is 5 percent. This is why small test batches are harder to reproduce than full ones, and why a bakery can hold a formula that a home baker cannot: the equipment is identical in kind, but the quantities are 20 times larger, so every display step counts 20 times less.

    A useful rule of thumb that follows from the table: keep any ingredient you care about above 20 times the display step. On a 1 g scale that means 20 g — which is exactly why salt at 10 g is borderline and yeast at 5 g is not.

    Frequently asked questions

    Is a 1 g kitchen scale accurate enough for bread?

    For flour, water and salt at 2 percent or more, yes. For yeast under 5 g, no — the relative error exceeds 20 percent. Use a 0.1 g scale for anything below 5 g.

    Why does my scale read differently after taring twice?

    Mostly load-cell drift and off-centre loading. Place the bowl in the same spot each time, let the scale settle for a second, and avoid taring repeatedly without removing the load.

    Does a 5 kg scale lose precision at low weights?

    Not necessarily, but many do: the same load cell covering 5,000 steps has coarser behaviour near zero. Check repeatability at 5 g, not just at 500 g.

    Can I convert grams to cups instead?

    You can, but volume measures of flour vary by 20 percent or more depending on scooping. Weight is the only reproducible option; that is why baker’s percentages are written in grams.

    What is the single best upgrade for a home baker?

    A 0.1 g pocket scale, if you already own a decent 1 g kitchen scale. It fixes the only measurement where one step is a large fraction of the ingredient.

    Honest disclosure: the error figures are arithmetic from a 1 g display step and standard baker’s percentages, not lab tests of any specific scale. Your scale’s accuracy tolerance is a separate number — check the manual.

    Gear referenced in this guide

    Stainless steel kitchen scale with glass platform

    Stainless Steel Kitchen Scale with Tempered Glass Platform

    1 g steps, tare, tempered glass platform — the workhorse for flour, water and portioning.

    $72.99

    Damascus steel meat cleaver

    7 Inch Damascus Meat Cleaver, 73 Layers AUS-10 Steel

    73 layers, 7 inch blade: the kind of tool where mass distribution matters more than specs on a page.

    $102.99

    Sixteen piece camping cookware set

    16 Piece Camping Cookware Set, Outdoor Cooking Kit

    16 pieces for outdoor cooking — where approximate weights are usually good enough, and portion size is not.

    $93.99